

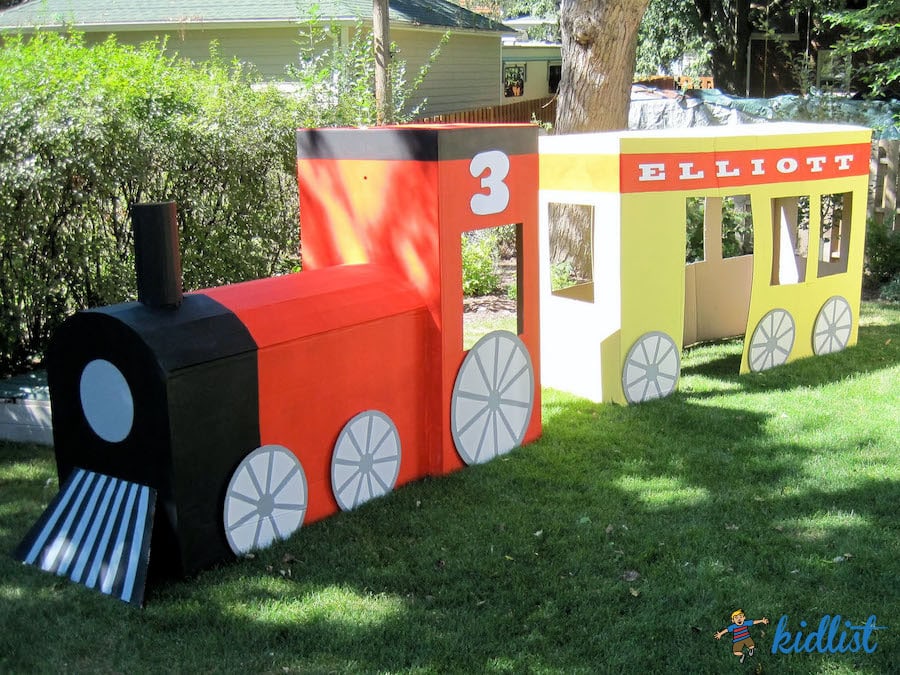
Kids love playing in cardboard boxes! It ignites their creativity and gives them a place to call their own. When my son turned three he was really into trains, so that coupled with his love for playing in cardboard boxes gave me the idea to make a cardboard train!
How To Make the Cardboard Train
Step 1: Procure Boxes
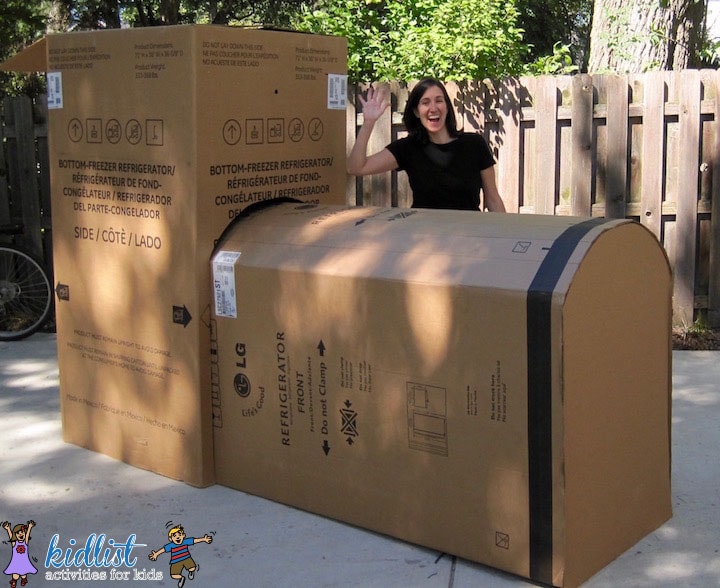
Get 4 used refrigerator boxes from a distribution warehouse. Usually the delivery people unpack the refrigerators and take the boxes with them to recycle, so the boxes are in pretty good shape. I used 2 boxes for the engine and 2 for the passenger car. You can also use this tutorial to make a scaled down version with smaller boxes.
Step 2: Buy Paper Tape
Join the pieces with paper tape. You can find paper tape at Blick Art Materials, your local art store, or click here to buy paper tape on Amazon. Paper tape is normally used to stretch watercolor paper, but is the best for this project because it’s thin and you can paint it. If you’ve never used it before all you have to do is cut it to the length you need, wet it (the back of the tape is like old fashioned stamps) and stick. Then you let it dry for a little bit. It’s really strong and does not come apart unless you don’t let it dry all the way.
Step 3: Make Passenger Car
To make the passenger car, stand both boxes upright and cut each one along one of the folds. This created two big flaps which can be opened and taped to the box next to it to join them together.
Step 4: Make the Engine
To make the engine, stand one box upright for the back half and one box on its side for the rounded part.
To round out cardboard you slice the top side with shallow cuts along the grooves the entire length of the box with a utility or mat knife. When you make these cuts, the top layer of the corrugated cardboard is cut but the bottom layer stays intact to keep the shape. You don’t have to cut along every single groove; skip a few in between.
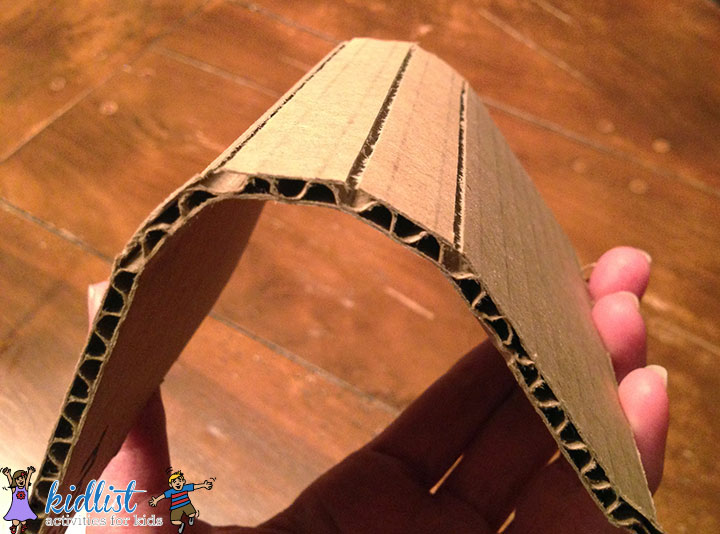
The more cuts you make along the radius, the more smooth the curve will be, but you don’t have to overdo it. After making the cuts you will find that you can bend the box to make the curve. You could use paper tape to cover the slits after you are done putting it together, but it’s not necessary. Then cut a hole in the tall box for the door and use that piece for the front of the engine to form the box.
Step 5: Make Wheels
Finally, make the wheels using leftover boxes or cardboard. Again, use a utility knife to cut them out. To make the wheels perfect circles use this little trick to make a big, homemade compass!
- Make a long cardboard strip
- Put a push pin on one side and make a hole on the opposite end big enough to poke a marker through
- Stick the push pin in the center of the cardboard and move the marker around to make the circle
Step 6: Paint the Train
Paint the train with latex house paint. I thought about spray paint but that gets really expensive because of the size. It seems like regular paint is going to be too wet and make the cardboard wrinkle and get all wavy, but it didn’t. I used the cheapest stuff I could find at our local home improvement store. I ended up getting red, yellow and black and mixed the colors to save money. If you aren’t too particular about colors, sometimes paint stores will give away the paint they mixed incorrectly (or at least sell it a lot cheaper).
You can of course paint the train however you would like… Design it to look like Thomas the Train made from cardboard boxes or a cardboard box Polar Express.
Have fun!
Have you and your kids created something out of cardboard boxes? Inspire all of us by posting your pictures on the Kidlist Facebook page. Or tag us on Instagram!
Projects Inspired by Our Train
Thanks so much for all of your emails about the cardboard train! We’re so glad this project inspired you and we love seeing what you created.
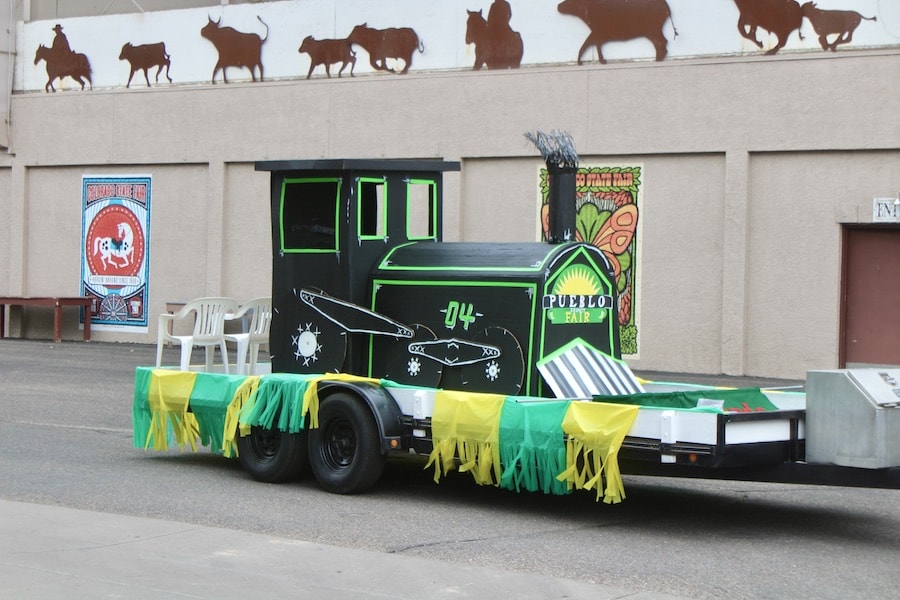
Brenda Johnston from Pueblo, Colorado sent us photos of the train that they made for their county fair float. (Thanks, Brenda!) She made a kid-sized door in the back and hung a black curtain, which was a tablecloth from Dollar Store, for easy entrance and exit. They are planning on cutting down the cow catcher and decorating the train for their Christmas Parade of Lights. How cool that they can use it again!

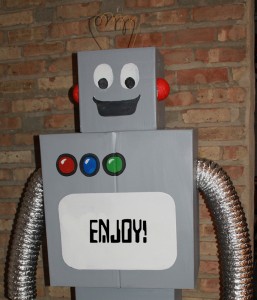
You also might be interested in how to make a cardboard robot…
I made a cardboard robot to hold balloons at our front door for a robot-themed birthday party! Click here for tips on how to make a cardboard robot or click on the image below.


59 Comments. Leave new
Thank you so much for this, I needed a train for VBS for my church and had no idea where to start and this is perfect, thanks for sharing.
Correna, How did this train go for VBS. I’m in the same boat right now for July and thought of making this train with 3-4 of the yellow cars.
After using the train for my son’s birthday party I donated it to a preschool, who played with it outside for a few days, so it held up pretty well!
This is awesome!! I’m going to make for my son’s choo choo party. Thank you so much for sharing such a wonderful project :)
Thank you so much for this fun idea! I have been searching all over the internet for how to build a train out of cardboard boxes. I am doing the Polar Express them for my son’s 1st Birthday in December and had no idea where to start! If you have any other pointers for me when making this that would be much appreciated! Thanks so much for your fun and creative idea!!! :)
I’m glad you found my cardboard train and I appreciate your comments! If you have any questions about making it or you get stuck, feel free to email me at annie@mykidlist.com.
Emily, I would love to see pictures of your Polar Express Train made out of cardboard.
This is awesome, i am gonna build this with my niece today, gotta enjoy time with her while she is visiting us here in Belize .
Great! I hope you had a wonderful day creating. :)
I am going to try this for my sons birthday in April! Got my refrigerator boxes today! I may be emailing you with questions!
Absolutely Love it. I will try it but my question will be how to use it at the party. I created a simple pirate ship for my son’s birthday but it was small and easy to take pictures with. This seems large and wondering how to utilize it.
The kids at the party were pretending to take train rides, set up chairs inside and served water to each other, ate in the train and we took a group picture with all the kids peeking out of the windows!
Trying this for my nephew’s birthday party this month but nervous about doing the rounded part of the train and how to cut it correctly! Any tips??
I’m excited for you to make the train! It’s a fun project. To make the rounded part you have to cut through only one layer of the corrugated cardboard along the grooves with a utility knife. You don’t have to cut along every single groove; skip a few in between. The more cuts you make along the radius, the more smooth the curve will be, but you don’t have to overdo it. I did a little sample for you and took a picture so you can get a better idea (https://mykidlist.com/wp-content/uploads/2013/04/IMG_2127.jpg). You could use paper tape to cover the slits after you are done putting it together, but it’s not necessary. If you have any other questions or need me to clarify, let me know!
Annie
Annie,
Thank you so much for responding! The visual was really helpful!! Again thanks for sharing your wonderful idea!!
How long did it take you to make it? Also, how long did you let the paint set before adding details? Love your ideas. Thanks, Shirley
It took a few days… I can’t remember exactly how many because I mostly did it while my son napped, so it was an hour here and there. He liked helping towards the beginning when I was putting the boxes together, but I didn’t want to tackle painting with non-washable paint while he was running around the backyard! Anyway, the paint dried really fast since I was working on it outside and by the time I painted the base color it was already dry and ready for the details.
Thank you! I think I had better get started to have it ready by June!
I am so excited to attempt this for my twins birthday in September! Best looking cardboard train I’ve seen online!!! Thank you for sharing!!!!
Can you do part of it with washer/dryer boxes?
Yes, you can make the entire train with washer/dryer boxes. It will just be smaller, but it will work well and turn out great I’m sure!
Thank you!
I was able to get 3 refrigerator boxes (yay). I’m thinking about making the nose of the engine with a smaller box as its been so difficult for me to get refrigerator boxes. Do you think it will look weird if the nose of the engine is a washer/dryer box?
No, I don’t think it will look weird, but you might want to make one of the refrigerator boxes shorter that will make the higher part of the engine. Do you know what I mean? I think it might look better proportionally if it was cut down a little, but I think it’s fine if the passenger car is taller. Just scale the enginer down but keep the passenger car the same so kids (and even adults) can walk into it and play. :) Good luck! Let me know if you have any other questions.
Great. I was actually able to get 1 more refrigerator box this past weekend so I have 4 refrigerator boxes now :)
Good! I would love to see it when you are done!
How much paint did you use?
I bought the cheapest gallons of red and yellow paint that I could find and also one quart of black.
I love your train!! What an awesome idea. I’m going to attempt to make this for my son party in February.
Annie
First of all thank you so much for all of your great ideas for kids’ activitiesand crafts. You are an amazing young woman. I’ve had more time this summer than during the school year (as i’m a “grand” and help my children out with a little childcare during the school year.) to check out kidlist and it’s the BEST.
Not only are your suggestions for activities fantastic but also the crafts are wonderful …. Like this train
Truly amazing. Kudos to all the moms who try this. It’s awesome for those little engineers ! I briefly considered it as a surprise for my 2.5 yr old grandson until I realized I would have a difficult time getting the boxes in my mini/cooper !! :-)
Thank you so much for your kind words! I’m glad you enjoy the site; that’s so nice to hear.
I will be doing a train for a float for heritage day near our church. ‘Trains’ are the theme and I will be adding the words “Train up a child in the way he should go” to tie it in to our church and the kids (who will be riding the “train” during the parade. Thanks so much for the info. Hopefully this will be a great way to incorporate lots of young families in our church. God bless you!
I’m so glad, that sounds wonderful. :)
This is amazing. Thank you. Is it weather proof? where we live, it rains a lot. How can I make it weather proof without using expensive plywood. Would love to be able to use cardboard boxes still
Thanks Dalia. :) I haven’t looked into weatherproofing cardboard, but I’m thinking there must be a paint that would accomplish that? I would recommend painting the inside and outside in that case.
Could you make the train to go over a riding lawn mower? It would pull a barrel train in a Christmas Parade. Was thinking Polar Express. Any suggestions?
I’m sure you could if you use the techniques outlined above and make sure you aren’t covering any parts of the lawn mower that get hot for safety reasons.
Thank you so much for the awesome ideas that you share and the great tutorial. My grandson is having a 2nd birthday party and my daughter and I are wanting to attempt this. Keep up the wonderful ideas and moms and grandmas like me will be able to attempt projects we never would have thought of on our own.
I will be following you for a long time. # 2 is on the way:o)
Lesley
You are so sweet. I’m glad you like the train and appreciate your kind words!
I totally agree with all of the other reviewers about this train. It is the best looking one on the Internet! We are making one now for our grandsons Christmas preschool program. We are only attempting the engine. Thank you so much for all of the information. I could not locate the paper tape that you had mentioned. We used masking tape and it seems to be holding the paint. Thanks again! Happy Holidays!
Thank you so much! I had a great time creating it and it makes me happy to see so many other people enjoying it too. Happy holidays to you as well!
Is the passenger box open on top?
No, the flaps from both boxes form the top. You can tape them closed before painting.
I’m curious how much paper tape you needed to buy for this? I’m making this for my twin boys 3rd birthday and I want to make sure I buy enough. Thanks! This is an amazing looking project and I can’t wait to tackle it.
I believe I used under 2 rolls.
Hi Annie,
How did you transport the refrigerator boxes to your house? We don’t have an SUV or large vehicle. Any tips? Thanks so much.
Hi Fatimah,
I actually tied them to the roof of my car! Not a super fun experience, but if you tie them tight and drive slower it will be okay. Or you can borrow a van?
Thank you so much for posting these construction tips! It was just what I needed!
You’re welcome! I’m glad it was helpful. :)
Does the engine have a floor or did you cut the bottom part off that would be on the ground to use for other parts? (for instance the wheels and engine front?) I see the passenger car does not have a floor. What about roofs or are the tops of the engine and passenger car open? Does the front part of the engine act as a tunnel to the main engine piece or is it closed off? Thanks! Building this fun project this weekend for an upcoming birthday party.
Neither the passenger car or the engine has a bottom, but they both have roofs. The two parts are separate, but I suppose you could connect them with a tunnel. I’m not sure the passenger car would be sturdy enough with another cutout in it, unless the tunnel supported it.
Thank you! I need a train for Christmas Play at Church. Great ideas, God bless you!
You’re welcome!
Did you prime the boxes before painting them or just do multiple layers? Google is telling me if I don’t prime then I’ll have to do multiple because the paint will soak I’m and look pail when it dries. Also It can warp the boxes? Would live insights on this !
I didn’t prime the boxes and just did two coats where it was still showing a little cardboard through. If you are doing light colors, priming might be a good idea, but with reds, greens, blues, etc. priming is unnecessary.
Hello Annie,
I wanted to thank you for the pattern idea for making a cardboard train. It was perfect! We had our 4-H County Fair with the theme “All Aboard” and made a float for our parade. It came out so cute, well designed and sturdy. We found the Paper Tape you were talking about and it holds it together so well. We are going to use it one more time and light it up for our town’s Christmas Parade of Lights before recycling. Thank you so much!
I was going to attach a photo but it wouldn’t let me in the comment box.
Brenda
That’s so great! I would love to see a photo. You can email me at annie@mykidlist.com if you have time!
Where exactly do you get the cardboard boxes? Like a Lowes or Home Deport?
An appliance store is really the best place to ask since they tend to have more refrigerator boxes for a big train like this. Home Depot, Menards, or Lowe’s also has large boxes and you could talk to a manager about setting some aside for you. I got mine from Abt Electronics.